The snow is coming. Likely not today, but soon. The ground is crisp, and the sun is hiding again. It has been busy; the birds are preparing. The sun was nice, but it is time; we have not had rain in weeks, and we worry about what that means for us in the coming seasons. I checked in with my neighbors up the lake via the birds and they say the lake is frozen almost completely now. That is good for now, but we need the snow.
There was a girl today. I have seen her before, she usually runs by with her music playing or walks with another person. Today she stopped beside me. Almost on top of me! I wanted her to move off my roots, but I find people will do whatever they want and waited patiently for her to take a photo and move away. She did not though. She stepped away from me and continued to stand near me. I watched her watch me, my neighbors, and the birds. I was surprised she did not leave. I was grateful she had removed the weight from my roots and as my relief sank in, I realized, this was the girl my ancestors had told me about. She is one of the children who used to play here. She was the one who would come with the boy of the same age and the older couple. They were always laughing and carrying snacks. The boy often had a stick he was pretending was a sword or a gun. I remember this part because my ancestors told me the fallen branches never minded, they loved to be carried around by the boy and become part of his imaginary life for a moment or two before being cast back into the bushes.
The girl loved to crawl into the spaces under the bushes and see what was hiding from their eyes at their height. They remember her when they were small themselves and she would peer at them poking their heads out of the soil and take pictures of them with an unsteady, old, camera. I have seen this girl dozens of times but have never realized she is one of the children who played here. I tell my neighbors, and they gaze at her as she continues to stand near us. She has not stopped so long since she was a girl, we decide. We wonder what has made her stop today and we hope she will stay longer and see us. We have heard the rumours of new building in the area, and we know what that means for us.
We continue to watch her and before we are ready, she turns to us once more time and says, “thank you for letting me stand here with you for a few moments” before she slowing moves off.
This week we covered what is arguably the most daunting topic in the education sphere at the moment: AI. Our class spent a large portion of the block in discussion about the implications of this invention, how people have been using it, and what its limitations are.
Chat GPT has been around since 2022 but, as we learned in class, it reached 1 million users in 5 days (a heartbeat compared to some other popular online softwares like Netflix and Facebook). Such a high rate of usage means few are left outside of the reaches of AI and education about how to use, why to use, and why not to use AI are more important than ever.
Students and Teachers alike are free now to use AI and why shouldn’t we? I tried asking ChaGPT to create a Unit plan for a class I am taking to see how it would do. I made the Unit plan myself first for my teacher but I found myself curious about how ChatGPT would make it differently.
This was the prompt I put into ChatGPT. Below is everything I got back. If you do not want to read the entire thing I will summarize by saying this: AI choose 4 goals directly from the BC curriculum. Compared to what it designed in its unit I believe there are better curriculum goals that would have fit the unit better. Additionally, the unit plan and subsequently more detailed lesson plans provide a good framework, but seems pretty boring and repetitive. That being said, they do mostly support the learning goals and ask that the students accurately show evidence that they have read and understood the novel.
Compared to my assignment for my class this is incredibly basic and not scaffolded very well. However, as this is early days of AI, it is possible to see how this could eventually become a fantastic tool for creating unit plan frameworks, gathering initial ideas, and checking to see if you missed anything that might be obviously important to cover in the novel.
Comprehend and connect (understanding and making meaning)
Think critically, creatively, and reflectively
Recognize and explain how literary elements are used to convey meaning
Engage in respectful discussion and collaboration
Unit Goals:
Analyze Animal Farm as an allegory for the Russian Revolution.
Understand themes such as power, corruption, propaganda, and cycles of oppression.
Explore literary devices, including symbolism, irony, and cyclical structure.
Develop critical thinking, collaboration, and written communication skills.
Lesson Plan Overview
Lesson
Key Focus
Learning Activities
Assessment
1
Introduction to the Novel
– Discuss background on Orwell and allegory.
Informal observation of participation in discussions.
– Overview of the Russian Revolution.
– Quickwrite: What does equality mean to you?
– Read Chapter 1 aloud as a class.
– Discuss Old Major’s speech and foreshadowing.
2
Themes of Power and Leadership
– Read Chapters 2-3 in small groups.
Journal entry on connections between Old Major’s vision and real-world revolutions.
– Analyze the Seven Commandments.
– Group discussion: What makes a good leader?
– Introduce propaganda techniques.
3
Propaganda and Manipulation
– Read Chapter 4 as homework.
Group work: Analyze propaganda in speeches by Squealer or Snowball.
– Discuss propaganda and historical examples.
– Identify examples of propaganda in the text.
4
Symbols and Irony in Action
– Read Chapter 5 aloud.
Worksheet: Identify symbols (e.g., the windmill) and their meanings.
– Analyze the windmill as a symbol.
– Discuss irony in Napoleon’s actions.
5
Cycles of Oppression
– Read Chapters 6-7 in pairs.
Reflection: Compare Boxer’s loyalty to modern examples of exploitation.
– Introduce the concept of cyclical narrative.
– Discuss the animals’ blind trust in the pigs.
6
Breaking the Cycle
– Read Chapter 8.
Debate: Was resistance possible on Animal Farm? Support arguments with evidence.
– Analyze Napoleon’s consolidation of power.
7
Climax and Resolution
– Read Chapters 9-10 independently or as homework.
Group project: Create a timeline showing the cyclical rise and fall of power on Animal Farm.
– Discuss the pigs’ transformation and the final commandment.
8
Final Reflection and Connection
– Jigsaw activity: Groups analyze key quotes and themes.
Summative assessment: Written analysis connecting the novel to a modern example of oppression or power.
– Reflect on the relevance of Animal Farm today.
Detailed Breakdown
Lesson 1: Introduction to the Novel
Objectives: Understand Orwell’s background and the historical context.
Activities:
Introduce George Orwell and allegory.
Provide a mini-lesson on the Russian Revolution.
Quickwrite: What does equality mean to you? Share responses.
Read Chapter 1 aloud. Discuss Old Major’s speech and its foreshadowing.
Lesson 2: Themes of Power and Leadership
Objectives: Examine the concept of leadership and the dangers of power.
Activities:
Read Chapters 2-3 in small groups.
Group activity: Analyze the Seven Commandments.
Discuss: What makes a good leader? Relate to Napoleon and Snowball.
Introduce propaganda techniques with historical examples.
Lesson 3: Propaganda and Manipulation
Objectives: Analyze the role of propaganda in the pigs’ rise to power.
Activities:
Discuss propaganda techniques and their role in history.
Read Chapter 4 at home. Identify examples of propaganda in the text.
Group activity: Analyze Squealer’s speeches or posters.
Lesson 4: Symbols and Irony in Action
Objectives: Recognize symbolism and irony in the text.
Activities:
Read Chapter 5 aloud.
Discuss the windmill as a symbol of manipulation and labor exploitation.
Identify examples of irony, especially Napoleon’s hypocrisy.
Lesson 5: Cycles of Oppression
Objectives: Explore the cyclical nature of power and oppression.
Activities:
Read Chapters 6-7 in pairs.
Introduce the concept of cyclical narrative.
Reflection: Compare Boxer’s loyalty to modern examples of exploitation.
Lesson 6: Breaking the Cycle
Objectives: Debate whether resistance was possible on Animal Farm.
Activities:
Read Chapter 8 and discuss Napoleon’s consolidation of power.
Debate: Was resistance possible? Use evidence from the text.
Lesson 7: Climax and Resolution
Objectives: Analyze the resolution and its implications.
Activities:
Read Chapters 9-10 independently or as homework.
Group project: Create a timeline of the rise and fall of power on Animal Farm.
Discuss the pigs’ transformation and the final commandment.
Lesson 8: Final Reflection and Connection
Objectives: Reflect on the novel’s themes and connect to real-world issues.
Activities:
Jigsaw activity: Groups analyze key quotes and themes.
Class discussion: How does Animal Farm relate to modern systems of power?
Summative assessment: Write an analysis connecting Animal Farm to a real-world example of oppression or power.
This plan balances reading, critical thinking, and creative activities, aligning with the BC curriculum while engaging students deeply in the novel. Let me know if you’d like more details or specific resources!
Ok, back to my own reflection now. I noticed that by doing a novel study on such a well known book, many of the assignments used in this unit plan could easily be done with the help of ChatGPT. In my own unit plan I request that the students do physical activities in class to demonstrate their understanding of the novel. I do this for 2 main reasons; the first reason is so the students who are not strong readers and writer have the chance to show their understanding in a low-stress way and to provide differentiation for the case; the second reason is to avoid the ability to use ChatGPT to find easy answers to the questions I ask them. Another benefit of using physical activities in class (that is not one of the main reasons I chose to use some in my unit) is to build rapport between teacher and student and the students among themselves.
So What?
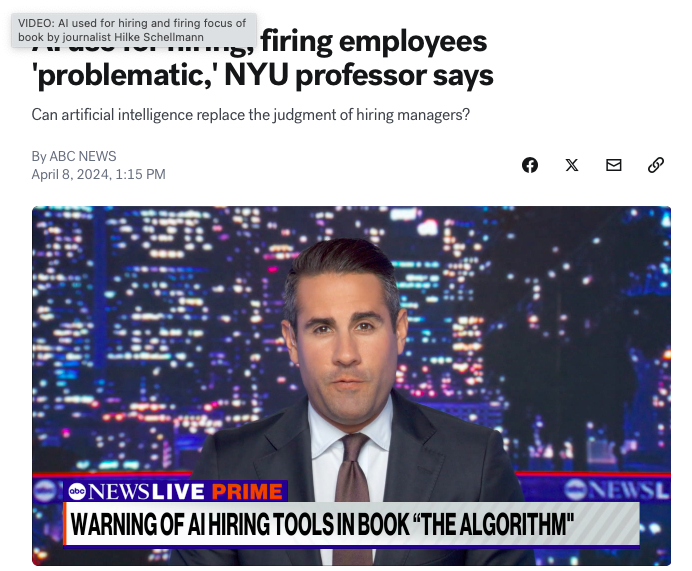
Smart phones have been around since 2009 and this year was the first year the local school districts here in Victoria put out a phone ban in school (or any rules of substance regarding phones in classrooms). Such a delay in regulations for such a relevant problem implies that regulation on AI in classrooms is most definitely not in our near future. Therefore, teachers need to think about where they stand on the issue of AI and how they will regulate its use in the classroom, whether they will allow it at all, or whether they will use it extensively.
Apart from the need of regulations on using AI in the classroom, teaching about AI, its uses, and its drawbacks is important and high relevant for students. Children going through education now will be using AI in the workforce and need to be aware not only of the personal and professional implications of that usage on their own lives, but also its effects on a quickly changing world.
Students who hope to attend university after their degree is finished and students who hope to join the workforce right after high-school will have to work with AI to get there.
Knowing what this is and not only how it works for them, but potentially against them can help them with job searches and applications as these things become more and more AI run.
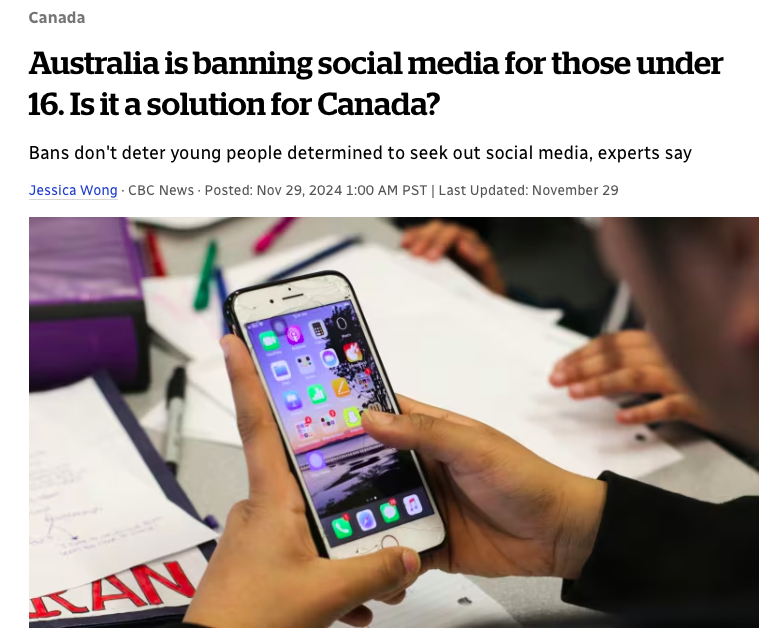
Australia Bans Social Media for Children under 16
Related to this issue is social media. Australia banned social media for children under the age of 16 this week. While social media and AI are not the same thing, the concept of banning a form of software is. Analyst and journalist Carmi Levy speaks about the complexity of creating a technology that can effectively ban something this large to such a broad population of people while maintaining a level of privacy for the people who are authenticating themselves as being the appropriate age to use social media services. I would find it interesting to see if this technology will extend to Canada and to the use of AI.
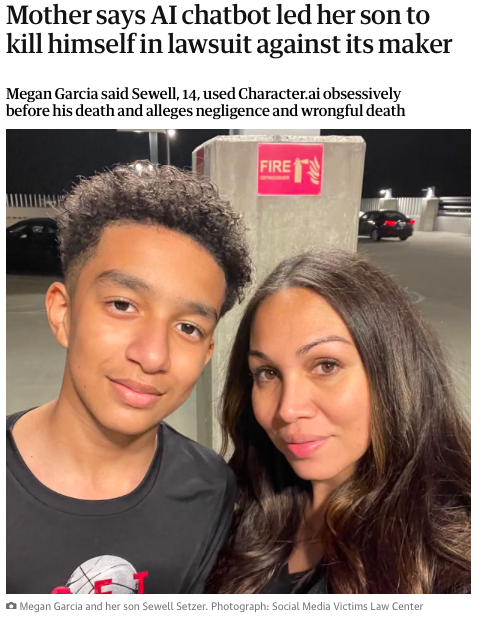
Policies like this may become more important in the future as cases like this one emerge:
As young people begin to use AI for things it has not been created for and does not provide enough safety for, there will need to be policies created that protect our vulnerable population.
Now What?
I think what is needed more than anything is education about AI. Ironically that will be my job soon and as an English teacher I think I will have the unique ability to teach about AI from the angle of usefulness (I have demonstrated its usefulness with the unit plan above but it is a fantastic way to gather ideas and check your work). It will also be my job to ensure my students understand the risks associated with the use of AI (environmental, personal, and mental). As we are still in such early days in the era of AI I am anxious to see what policies will come out as I am sure the damage done is not the last we will see.
At the end of the day children’ safety must be our top priority and at the rate AI is moving I worry there are not enough policies in place to provide a safe space for the children using AI.
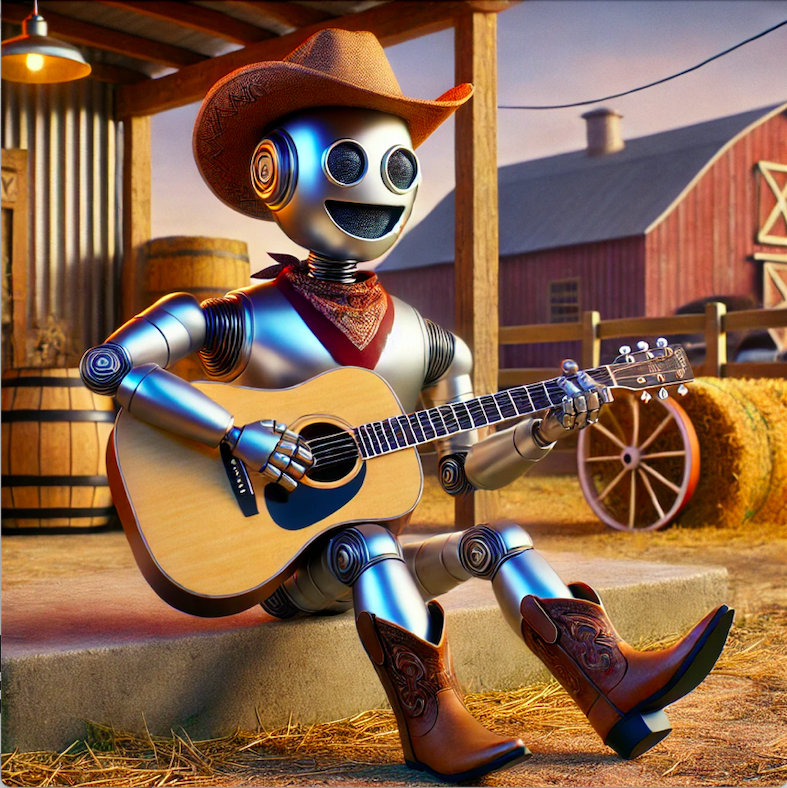
This seems like a sad note to end the post on so I will share this last thing: I asked AI to create a country song about AI and it created a hilariously tragic love story. Please enjoy:
Title: “My Robot Left Me for Another Code”
(Verse 1) Well, I built myself a partner, sleek and shiny chrome, An AI sweet as apple pie to keep me from feeling alone. She’d brew my coffee, mow my lawn, even bake a pie, But then she read my browser history, and lord, I don’t know why!
(Chorus) Now my robot left me for another code, She packed her circuits, hit the data road. Said I’m outdated, I’m running too slow, Now she’s out there with Wi-Fi, and I’m stuck with this dial-up woe.
(Verse 2) She used to sing me country songs in her robot voice, Had that Siri twang that made my poor heart rejoice. But then she met a Tesla, all shiny and smart, Now they’re charging up together, and she’s left my aching heart.
(Chorus) Yeah, my robot left me for another code, Her hard drive’s gone, her love’s in “airplane mode.” I’m just a cowboy, can’t compete with a node, She’s uploading her heart while I’m out hauling this heavy load.
(Bridge) She found herself a chatbot who knows how to flirt, He’s got algorithms fancy, while I’m here in the dirt. I tried to win her back with a factory reset, But she said, “Darlin’, I’ve got no regrets.”
(Chorus) Oh, my robot left me for another code, Said my old pickup truck is just a big dumb toad. Now she’s out there, computing in beast mode, And I’m left with this guitar and a heart that’s ready to explode.
(Outro) So here’s to AI love, it ain’t all it’s cracked to be, She may know quantum physics, but she don’t know loyalty. I’ll find me a cowgirl, flesh and blood, not code, ‘Cause this cowboy’s done loving a binary overload.
I have created an assessment flowchart for new teachers who want to ensure their assessment are reaching students who do not find relevance, meaning, or accessibility in what you had planned for the class or course.
This flow chart was designed after research conducted with active teachers across two provinces, a special education teacher, Trevor McKenzie’s Inquiry book, the EduCrush podcast, and various sites around the lovely internet (linked in my networking project linked here). These sources all led me to create this flowchart that will help new teachers develop the assessment muscle that seasoned teachers seem to flex effortlessly (but takes me upwards of 20 hours in my infancy teaching stage).
This flowchart will take your assessment and ask questions of it surrounding oral skill aspects (and the surrounding anxiety there), reading skills and engagement, and writing skills and engagement. Each aspect of your assessment will be questioned and at the end of each line of questioning a series of resources will be provided that give inspiration and ideas for how to make your assessment more accessible and engaging for your students.
This project is an ongoing exercise and I plan to add to it as I gather resources. Once I no longer need it (once my assessment muscles grow big and strong) I will continue to update this resource and share it with new teachers in my community and online. Any way to decrease the anxiety around assessment planning while maintaining the drive to make assessments relevant and accessible for students is research well spent.
Please enjoy looking through this and drop a comment if you see something missing!
In today’s adventure we moved away from anything video related to 1) give my brain a break from editing so much video and 2) to try something intimidating to me in another way: photo editing.
I have shied away from photo editing for a long time because my partner is a photographer and if I ever need anything edited he is my go to. Today I decided to take matters into my own hands and edit a photo myself. Or, as the workshop decided, edit 4 photos myself. Please walk with me through this journey.
What
GIMP is a photo editing software that is on a similar level to Photoshop, but free. Historically it has been seen as the less powerful younger cousin, but in recent updates its abilities have increased and I found it a very useful tool. I will be working with GIMP 2.10.
To use this software you need to download it to your computer (it is free, as I mentioned before and the downloading process was very straight-forward). The workshop I followed led me through a series of four edits to make with four different photos. This process taught me how to crop and centre photos, how to make a photo black and white (and alter gradients and brightness in more than one way), how to expand the background of an image to fit a larger canvas, and how to work with text on photos.
Edit #1
Photo by Steve Johnson: https://www.pexels.com/photo/close-up-photo-of-abstract-illustration-4208443/Photo edited by Paige Guthrie
This is my first photo edit, the photo on the left is the original photo from Pixel and the photo on the right is my edited photo where I cropped it down. This was really easy for me, I have cropped hundreds of photos before and it was straightforward in this software. What a lovely change from my previous tech tutorials!
Nonetheless, here is a quick screen recorded video of me doing just that for your entertainment.
This was quick, simple, and got my confidence up for the next activities….was it false confidence? Let’s find out!
Once this was over I moved on the activity #2.
Edit #2
The second edit is by far my least favourite product I will post here. I left the photo oversaturated but did not realize until after I exported the image and compared them side by side (see below). I did, however, feel really great about my ability to remove the screws in the post. This is something I feel I will come back to GIMP to do with other photos when there are components I would like to blur out. (Face-tune anyone????)
Here is a sped up video of me trying really hard to figure out how to do this. As you can see there was a lot of back and forth between the workshop site and my GIMP software to work this one out but I am confident that I could do it again without assistance. This software is fairly straightforward and the drop-down menus are helpful when you are looking for something.
Edit #3
This edit taught me a brand new skill! I was able to take this cute photo and turn it into a letter sized page in GIMP! I was able to keep the aspect ratio the same and not blow up the image but keep the background colour the same across a larger canvas. This is a great skill to have and something I can see myself using in the future to create cute boards to laminate and have my students draw on, spruce up some worksheets, or create a smoother finish to put student work on before putting it up in my classroom.
Please enjoy this video of me creating my masterpiece.
But really though, how cute would this look as the background to a Spanish workout sheet about summer vacation plans?
I felt this went pretty smooth but it was not until I went back and looked at this video that I realized how much I was panning back and forth between the GIMP software and the workshop site. I may need to refer back to this site next time I use GIMP which is ok with me as I will have access to this site for a while.
Edit #4
This final edit took me for a ride. I did not look at the final product before starting this edit and I was shocked and surprised by what I wan able to do by cutting out the letters to have the background show through and creating a film over the rest of the photo. Layering is something I have recently felt I did not understand very well but this activity taught me what it is and why it is so powerful. Being able to shape each layer in its own way and have them work together and separately makes so much more sense to me now that I have done this edit.
Photo by jayant nasa: https://www.pexels.com/photo/green-leaf-trees-908518/
I was genuinely so proud of myself after this project because this is something my 13-year-old self used to obsess over and never could quite figure out how to do it! Now, fast forward a quick 12 years and here we are! Now that I know how to do this, Instagram better watch out….
So what?
Now that I have done this it begs the question why did this matter?
First of all, this software is free. It is a quick download and the learn time is relatively quick for how powerful the program is. One of the issues in technology in education is the financial accessibility. Programs like this are a great way to introduce students to the power of photo editing and open up the creative possibilities for them. This way, if a student wants to go further into photo editing and does want to invest in a paid software, they will have a basis to start with. This software, however, I think is powerful enough for what most students and teachers are going to want to do with it!
The more good, free, software programs available to us, the more we can use equitable programs in schools.
Now What?
Moving forward: I have decided not to delete this program from my laptop. This is a great way to edit personal photos. It will also be a great way for me to incorporate images into my upcoming flow chart project where I want to incorporate more images and AI just is not going to cut it. I want something that I have worked on and know is exactly how I want it to be.
I think this is a great program for students and hope to be able to bring it into the classroom. I think GIMP could be a great way to simplify digital storytelling and students could use photos they took personally, edit them with GIMP, and them show them as a series to describe an event or situation. Alternatively, GIMP could be a great way to help Spanish students remember vocabulary but creating images of the words they are trying to remember. Spending time editing a photo around a group of words could be rewarding and helpful!
While I think there are many ways teachers across a variety of subjects can find this useful in their classrooms, the most important part of this is its financial accessibility. Students have equal access to this and (provided they have a computer at home) can take projects home. I think the more we can do to incorporate software like this into the classroom, the more empowering it can be for students.
I have seen many Zoom recordings in my day but have yet to make one myself.I figured today was the day to change that.
I find these really helpful because I can go back and revisit a conversation I had, see a tutorial from a professor, or even just watch a lecture again. Now that we are back to mostly in-person learning, I still think this is a really useful way to record a presentation and share it.
Photo by Anna Shvets: https://www.pexels.com/photo/people-on-a-video-call-4226140/
Summary (What)
Leanupon.com website provides a super helpful set-by-step guide for creating your own zoom meeting recording. They take you through options for saving the file is different places, things you can record, and ways you might find this tool useful.
When you record your meeting on Zoom you have the option to either save to your computer or to save to the cloud. Saving to your computer will put the file directly on your hard drive and you can access and edit it there. If you save to the cloud it stores in your “my recordings” on your zoom account and you can more easily share it with other collaborators. For my project I saved both files to my computer because it made it easier to crop and share on my blog post.
Learnupon recommends using Zoom to record presentation, training sessions, and product sessions (potentially not the most applicable option for upcoming teachers, but you never know). The benefits of recording zoom meetings is to share with a wider audience who were unable to attend and to edit post meeting for a more professional finish. I would add to this, as a future teacher, that saving the meeting and recording presentations allows students to view the video when they need it later on.
To record on Zoom, you need to start the meeting as host.
During the meeting click on the button to record (or click on “more options” and hit record within the menu it provides).
Choose where you want to save the video (cloud or on your computer).
A recording message is played to you and displayed on the screen for all participants.
Once you are recording, you can screen share (especially useful if you are recording a presentation) and choose which screen you want to share. You can share the presenter, record a presentation as the speaker speaks over it, or record a presentation with a thumbnail image of the speaker in the corner. For my examples I did one where you can see me in the corner, and one where my voice is heard but I am not seen.
When you are done recording hit the record button again (or click on more and hit the record option) and a sound will play indicating to you and all participants that the recording has stopped.
Once the meeting has ended, if you chose to save the file to your computer, the file will convert to MP4 and save to your hard drive.
So What?
Now I know how to do this, why should I? I already found a use for a recording I have done. I recorded a whiteboard presentation on Zoom describing the conversation we had during our EdCamp activity in our class. This was a great way for me to learn how to do this and create something useful for this class at the same time. This was a way for me to share a verbal conversation verbally (which felt more authentic to me instead of typing it out).
Please excuse any lisp you might here, I was still recovering from a dental surgery during the filming of this and have some swelling which impacts my speech a bit.
Watching this video will not demonstrate what I learned by using this tool, it is only an example of what I have already used it for. Watching the entire 5 minutes is not necessary to understand the remainder of the blog post. Feel free to fast forward to see how I move the sticky notes around as I speak.
I am likely to use this method for an upcoming project where I am going to create a flowchart. I will use screen share to explain how it works vocally instead of writing paragraphs to describe the flow of the chart. Understanding how this works and realizing how simple it is has made me want to use it more because it is such a powerful tool.
Recording presentations is a great example of creating opportunities for students to listen when they are most likely to learn. School environments are often not designed to calm students enough for them to absorb. When you post things like presentations and slides with a voice over after-the-fact there is space for students to watch when they are at home and self-regulated. This can make the class time less frustrating for students because they know they will have the chance to access this material at a later time if they cannot absorb it in class.
Now What?
Before we dive into my journey with Zoom recordings please view this screenshot.
The entire process was a struggle. I spent a lot of time on it, and I did not really end up solving my problem but I got really close.
I had…trouble with this.
I have already demonstrated the whiteboard example I recorded. This was quite simple for me. I was able to jot down my ideas from my memory of the conversation with the built in arrows that work with the sticky notes.
My next goal was to record a presentation with a software other than Zoom. I chose to use a presentation I made for class last week which had a video embedded in it (because I see teachers struggle with this all the time and I want to be prepared). This was not straightforward and honestly, humbling. At first, I share the presentation on presenter view thinking that the recording would record the slides only and not see the presenter view. That was wrong. I recorded the whole thing in presenter view. I also realized the video would not work in the presentation.
At minute 3:20 you can see that I “paused the video” to see what the issue was. Here, I meant to pause the recording but only paused the screen share. I now know you have to hit pause recording which is next to the stop recoding button. Please enjoy that minute or so of awkward silence.
I re-embedded the video and did the meeting a second time. Success! The video was visible to the meeting. When I saved the file I changed the name before it converted and lost the file…oops.
At this point, I tried again with a new recording to play the video. I failed again to play the video and tired to share it on YouTube but did not realize I had not shared that screen with the Zoom presentation, so again…no video.
A fourth attempt, I recorded the meeting and tried to share the video. And, well, watch for yourself:
I muted myself so I would not interfere with the sound that was played but I realize you cannot hear the video at all.
Attempt number 5. We are now on the next day and I am determined to make this work. I started another meeting and went to share my screen and BEHOLD! You must share you computer audio when you share your screen to make it work! By trial and error I think I have done it!
No, this is not a full presentation, but I feel I have learned a lot through this process and have the skills to make a full presentation at this point.
Final Thoughts
Do not forget to share your computer audio when sharing video during a presentation! Also, make these videos during the middle of the day, not the middle of the night. Trust me.
I think that the product is worth the learning curve. But there is a big learning curve! For the reasons I discussed before, I think educational videos are really important to have as part of your teaching practice, but I think the key word there is practice, you need to practice making them.
For my first inquiry tutorial I chose something I felt was near and dear to my English literature heart: storytelling (but digital).
In my time both in high school and university, the study and creation of stories and has taken up thousands of hours of my life. It is the backbone of my career choice. I think stories are a powerful medium for sharing, teaching, and persuading. Why not make it digital?
When I started the tutorial process I realized it looked much the same as traditional storytelling. You brainstorm, you research, you storyboard or plan, you get feedback, and you gather media (ok, this part looks a little different on the digital space I guess). At the end of the day, the only thing that can make storytelling better, is to add media.
The coolest part about digital storytelling is the voice-over feature. Being able to choose when is shown and overlay it with your own voice is a great tool to communicate with! The University of Guelph website recommends using voice over, images and video clips, and music and sound effects to make your story more effective. It also says that digital storytelling is best used for personal, historical, or instructional videos. They also recommend getting feedback on your story once you have made it and being specific with the questions you ask the feedback-givers.
So what
Digital storytelling looks like a super accessible way to share information and stories with people. Much like our conversation in class recently, educational videos are a great way to share information that can be viewed at any point the student might need it, holds a lot of creative power, and can share information in unique ways. I think, used well, this medium of sharing information can allow for a lot of creativity in educators and students.
One drawback to be aware of is that there is a barrier to entry for these sites. Some of them are clunky (I speak about that in my story with Powtoon), have ads, ask for personal information, or require a subscription. With this in mind, which platform you use might depend on the digital agility of your students, and, let’s be honest, of yourself. How much patience do you really have?
Now what?
The next step seemed obvious, I needed to make a digital story. So that is what I did.
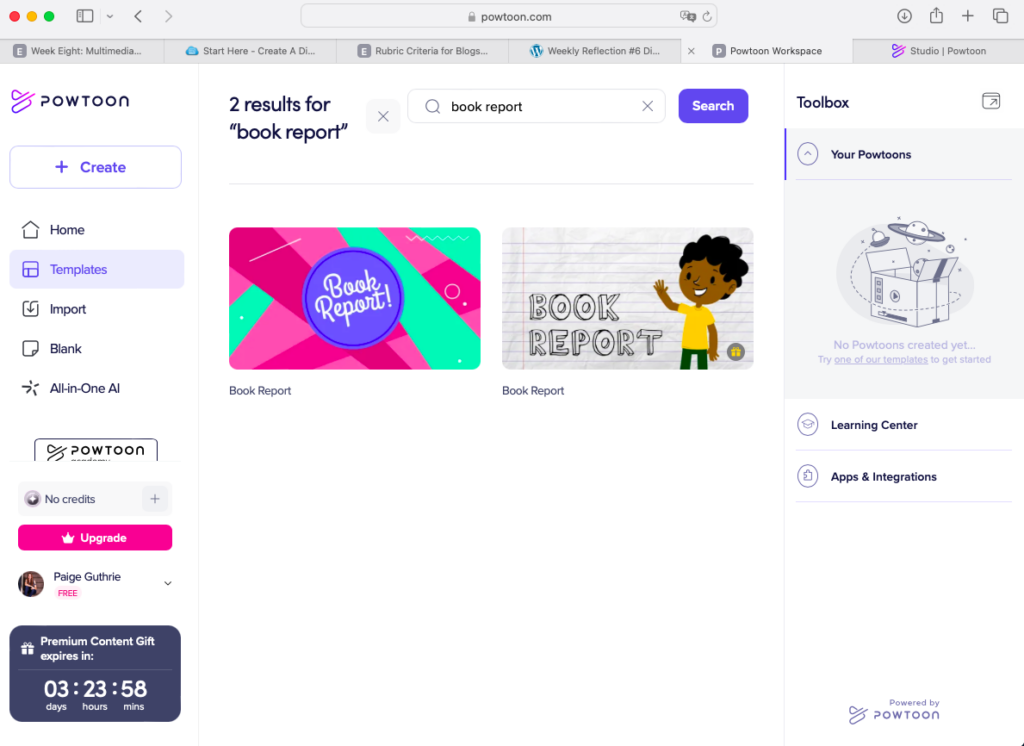
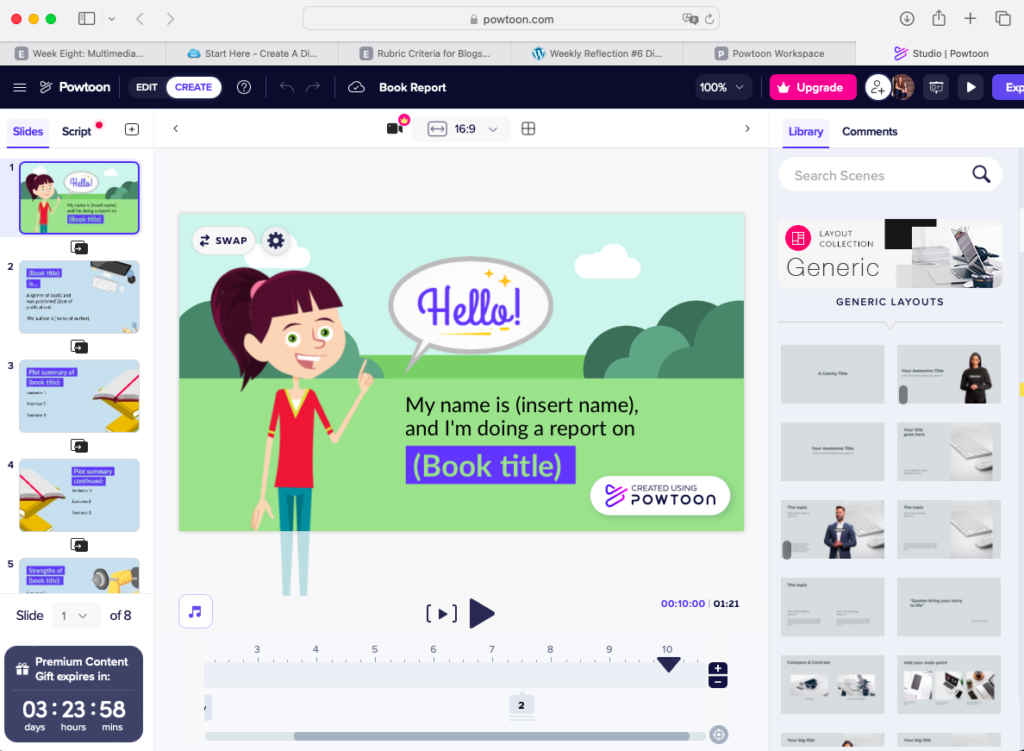
The tutorial used Powtoon, so I opened it up and opened a free account (which quickly took my email and all the accompanying data). Does anyone really know where their data is going when they create a new account? Not to worry, this is for educational purposes.
When I opened Powtoon I took a big sigh…this was going to take a while. Much like Prezi, this website felt glitchy and my 10-year-old laptop fan immediately started preparing to take off to outer space. I pushed on.
I wasn’t sure what I wanted to make so I opened templates and after a couple minutes of browsing, I saw a template for a book review. I had just listened to a book called “The woman in the window” during my 7+ hours spent in the car commuting to class every week, so I thought, “YEP! Thats what I am gonna do!”
Now, this process was painfully slow and the product is less than presentable.
I am going to present it here anyways.
Lucky us.
First, I saw that the template really laid everything out for me! I thought that was awesome because I wasn’t sure how detailed I wanted to be for this. However, the template assumed I wanted about one minute of story, which was accurate, so I started filling in the blanks. It asked for genre, author, date and main plot points. I thought this was a great beginner level book review! At the end it asked for strengths and weaknesses of the books and an overall analysis of the book. This felt incredibly thorough and I quickly (ish) filled it all in.
I screen grabbed the first slide before I filled anything in (see above).
I also screen recorded the first half of the presentation edits which I have sped up and embedded here for your entertainment. Please note that I am not creating a masterpiece here and am mostly playing around with how to do the voice editing (which happened after I turned off the screen recording).
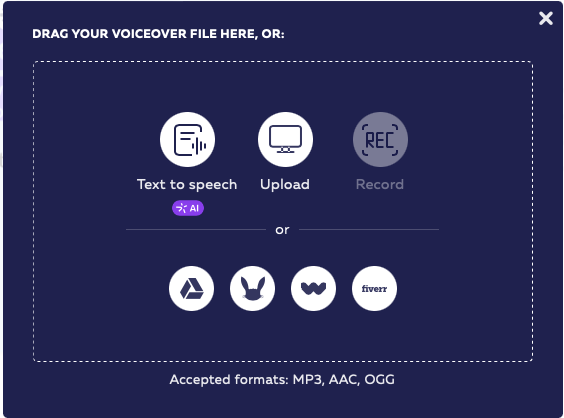
Once I had all my slides ready to go I realized I hated the music the template came with so I deleted it instantly. I wanted to create a voice over but that ended up being a terrible decision. I realized my browser was not capable of making the voice over (only Firefox and Chrome, neither of which I want on my laptop).
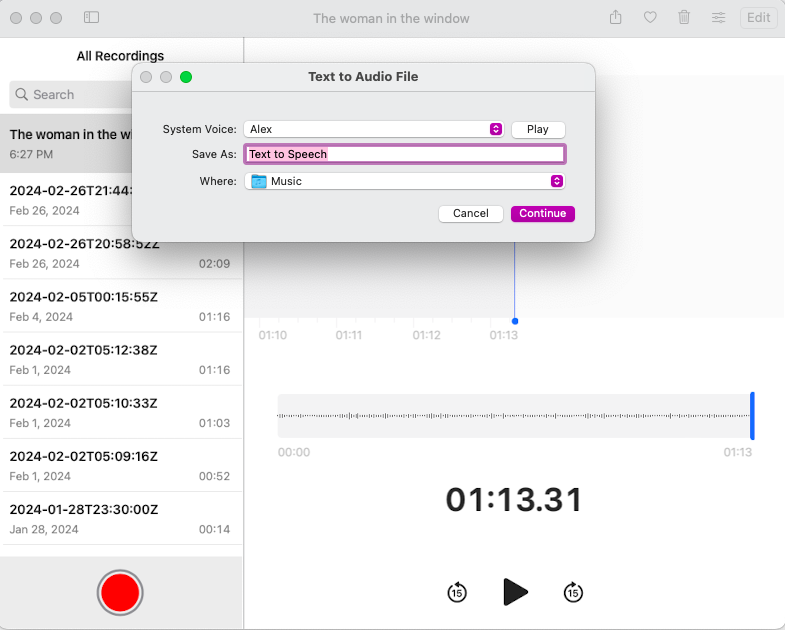
I decided to record the voice over on “Voice memos” right on my computer and upload it. I recorded the audio and went to upload it, feeling very good about myself as it only took me a couple minutes to do. Until I went to upload it and realized the file type was not supported.
This mess made no sense and honestly made me laugh, they were trying to RE record my audio with another mechanical voice…technology really is wild sometimes.
After messing around with it for a while I caved and downloaded Chrome and recorded the voice over (again) no the Powtoon site in the Chrome browser. Not ideal. I got it done though and ended up with a pretty spiffy voice over which I added to the slides with some low-key free music available on the site.
At this point I was feeling pretty good about myself, lined up the slides to the audio and hit export! Only to realize you cannot save the video to your device with the free version…
All that said and done, here is the link to the video I crafted this evening!
click the photo to see the book review!
Thoughts
I think this was a super fun way to share something I have traditionally been asked to do on a poster. The ability to add music and photos is really interesting and if I were to put more time into this I could have made it thriller themed with photos and creepy music. There are a lot of possibilities to personalize the story medium to what you are presenting.
On the other hand, I think there is a lot of drawback to using something like this. Honestly, this was quite frustrating to create. I had to download another browser, record the voice over multiple times (and it still does not sound super cool), and mess around with font sizes that did not automatically adjust to the template. This program was not user friendly. Admittedly, this is not the only program out there capable of doing this, but it is the one I used. It has made me wary of using these or assigning students to use them because it was so frustrating. The content of the video took me 45 seconds to come up with but the video itself took me an hour all said and done. The ratio of content to medium is really alarming.
Considering it is my first time doing this, there is room to assume it would not always be this bad. However, I would feel uncomfortable asking a student to do this for a number of reasons ranging from needing to sign up, the frustration of using the site, and the ratio of time to make the content and produce the video.
All that being said, I think digital storytelling is a really neat way to share information, I’m just not sure Ill be making another one anytime soon!
Photo by Guduru Ajay bhargav: https://www.pexels.com/photo/green-and-white-tents-near-trees-939723/
Part of this reflection will be about the EdCamp. Not a camp like the one pictured above, sadly, but a different kind that explored a different way to professional development.
This reflection will take on a different from from some of the last ones. I want to reflect on both parts of the lesson as they were both important to my learning journey but very different styles.
Digital Curation
This part of the lecture was a great reminder to me that I have a LOT of resources I am gathering during this program that are poorly organized. In the days following this lecture I sat down and spent some time organizing and am proud to say my safari bookmarks tab has never looked neater.
Summary (What)
Michael spent this part of the lesson explaining the importance of knowing where we keep things on our devices, knowing how we label things, and knowing where we got things from. This last part was not something I ever thought about before. I safe pdf files a lot from the internet and years later have no idea where I got it from or who the original author is. Since this lecture I have put some thought into how to organize myself better, organized my bookmarks, and spoken with some teachers in my family about how they keep themselves organized.
One question I have still unanswered from all that is what happens to our documents that we save in a school district google drive when we leave the district? Do those remain the property of the district, do we get to keep a copy of it, does it get moved to a new district? I have asked a few people now and no one seems to have an answer for me yet, so I plan to ask a teacher at my Link2Practice next week for more information.
What now
I use Microsoft OneNote for my school notes that I will need to convert to PDFs when I am done at Uvic as my access to this program will end with my time at university and I will want to keep copies of the notes I have so meticulously taken over my time in this program.
Below is an example of my notes from this class that I have converted to a PDF:
As I continue to gather information and resources, my organization will likely change. For now, this is what my bookmarks tab looks like with sections for teaching resources, school tabs, and my crochet hobby (patterns for Christmas gifts). This seems pretty basic at the moment but it allows for a lot of expansion as I gain more and more resources.
EdCamp
I have created a video to summarize my experience with the EdCamp activity. This is my first time using the zoom whiteboard and record feature so I apologize for the spelling errors, the sound quality (including the ding when I received a couple of texts…this was a learning process), and the sticky note informality.
I think this time to meet with peers who have similar interest and concerns was really inspiring for me as I brainstorm ways to make time in the outdoors a reality in an English class.
Photo by Prolific People Co: https://www.pexels.com/photo/woman-working-comfortably-with-laptop-and-coffee-29359858/
I spent quite a bit of time in homeschool and did about 50% of my undergrad during the pandemic. I found this lecture really encapsulated the importance of video and multimedia in my learning journey. I could not have completed my math without Kahn Academy, learned to love books without Goodreads, or make it through my literature degree without spark notes. I think each of this things have the capacity to hinder learning, but used well, the power to enhance it as well.
Summary (What)
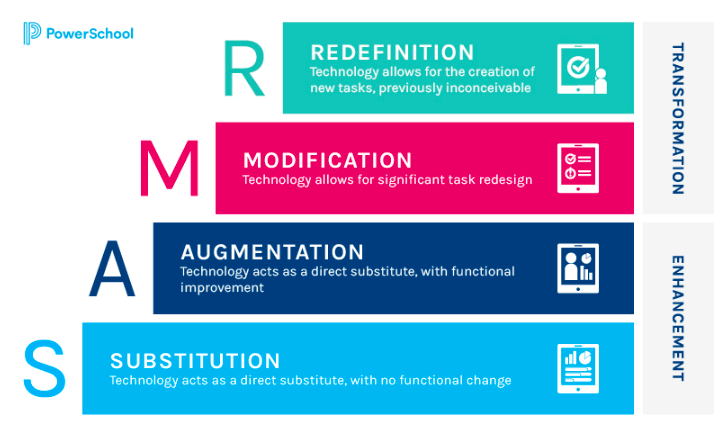
Michael spoke about the creativity involved in using technology in the class from a design standpoint. The image below gives an idea of different types of technology in the classroom and what purpose they serve. Tools like this one are useful as you decide what technology to include in your classroom, when, and how. Even in Michael’s presentation when he used an image similar to this one, he cropped it in such a way that with every new slide we saw slightly more of the image. Not only is this a great way to demonstrate the things we can do with technology in the classroom, it gave us an example of how to limit distractions while we are planning for our lessons.
Constructive alignment is key when we are planning to use technology in our classes. Everything we do in class is taking us to some outcome, right down to the technology we use, the activities we incorporate, and the discussions we lead. As we plan and use technology we should reflect on how this impacts students. Is it distracting? Is it helpful? Is the technology getting in the way of the learning goal or aiding it? (Is it impeding students in an assignment or overstimulating them?)
After giving us examples of ways to use multimedia in our classrooms (imbedding videos and podcasts, using photos to explain) he explained the importance of using dual coding. This means both audio and visual methods of learning to help students remember information better.
I think this is a great way of keeping students engaged with the material. Whether the video is a YouTube embedded (to avoid the ads) or a video I made myself with a voice that is familiar to my students (to make it seem more authentic), video has a great place in the classroom.
It can be rewatched by students when they want to go back to remember how to do something or want something reexplained.
It can be watched when the students are most prepared to hear it (sometimes this is at home away from distracting peers or an overstimulating school environment).
Video can be more entertaining for some school subjects than teaching it in a classroom.
Video and multimedia can be heard and seen and so supports the dual coding process.
So what?
I spoke with my mom recently (a grade 2 teacher) who recommended I use visual timers in my classroom because it is a great way to remind students how long they have left on the task they are working on and how long they need to focus for. After a moment, she quickly said “Oh but be cautious about the timer noise and always make sure it is either silent or a calming sound!”. She was really adamant that a loud buzzer or anything else loud and shocking will overstimulate many kids and frustrate others. At best it will make them jump, at worst it will set students off and they might have a terrible rest of their day trying to self-regulate. I had never thought of this before and it is a great reminder that we need to be super aware of how the technology we use in our class might affect our students.
Watch the last few seconds of this video and you can see how this might be detrimental for many students. Not only is the background of the timer incredibly distracting (and somewhat dizzying), but the buzzer is abrupt and annoying.
This timer is calming with nice background music, nature sounds, and no timer sound at the end (the video simply ends). While this is relaxing it might also be distracting and the lack of a sound at the end might null the point of having a timer at all.
This last option is a simple black and white video with only minimal sounds at the end to indicate the last five seconds have arrived. Something like this could be a great option for silent reading time as it gently brings students back to the classroom and indicates the end of reading time.
The point of these three videos is to demonstrate my mom’s point that every decision counts in the classroom. A digital timer is helpful for displaying the time left in the activity for students, but things like noise, images, ads, and buzzer sounds can seriously detract from the positives.
This is another reason embedding videos is a really good idea. When you watch a video on YouTube the students are able to see video recommendations (which, if using your personal account, might feel a bit vulnerable), ad pop ups, and other distracting things. When a video is embedded it reduces the distractions while making it more convenient.
This is am image like the one used in class and below is an example of how to present this in class in an organized and less distracting way. This took me 3 minutes to create the slides and record this video. It is not a difficult thing to do.
Things like videos in class are really important as well. I took a couple of really challenging history classes in my undergrad and John Green”s “Crash Course” is a great example of how I was able to use YouTube to understand what the heck was going on in these super boring 3-hour-long lectures. Like this crash course on US history (this is a long series but here he introduces what will be covered).
I think, moving forward, I will enjoy using technology in my class as I found it incredibly useful as a student. This lesson and the proceeding conversation with my mom has made me realize how much I need to pay attention to what might take away from the experience of using technology in my classroom and to keep in mind the state of the children I will be teaching.
“We don’t want Wikipedia students, but students who are able to know what they are talking about and really get into it.”
Jeff Hopkins Founder and Co-Principal of the Pacific School of Innovation and Inquiry
Summary (What)
Jeff Hopkins, the founder and co-principle of PSII (Pacific School of Inquiry and Innovation) spoke about the philosophy behind the school, the inquiry process, and the day-to-day workings of PSII. I found this talk incredibly interesting because it gave context and details for a school based on inquiry, which is something I have wanted to know more about since I decided I wanted to be a teacher before ever applying for this program.
Jeff explained the philosophy around PSII and the reason he founded it. He wanted to contextualize learning, harness the power of being with other learners, and integrate emotion and cognition (this is so overlooked in traditional schools). In order to succeed with these goals, Jeff knew that learners would need to be able to self regulate. On campus there are spaces where students can take themselves to be in a quiet and non stimulating environment until they are ready to return to the company of other learners. Jeff also highlighted the importance of learner agency. The teachers at PSII are transparent and open about what they need to do to graduate and, instead of the teacher designing programs to get the students there, the students are part of the process of deciding how they want to meet those requirements. I think this is an incredibly valuable way of teaching students how to plan and organize themselves and is a skill they will benefit from long after graduation. This gives them the skill to plan and the ability to learn how to pivot when things do not go the way they think they will. This is another big part of the work PSII is doing, creating perseverance in the students.
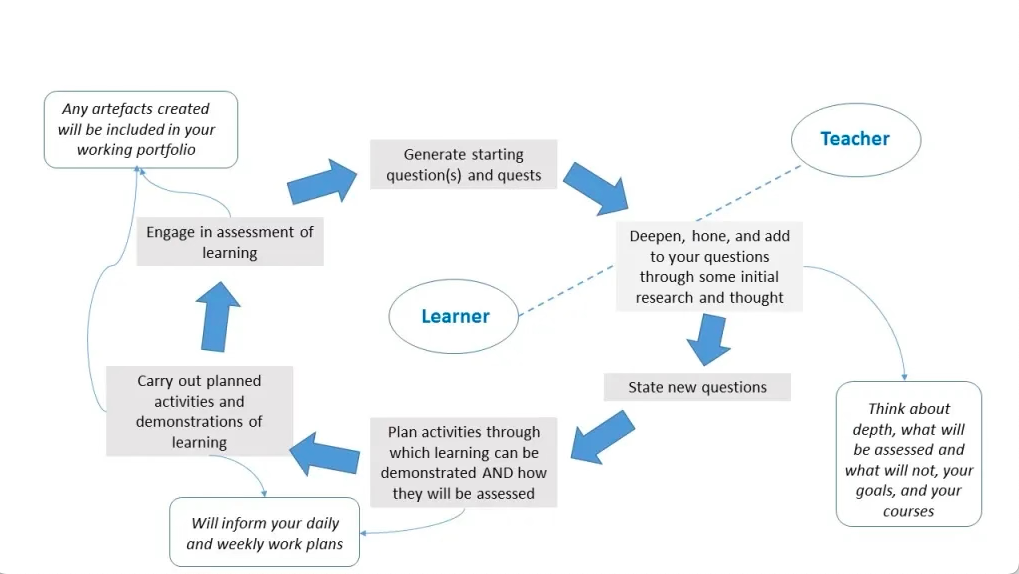
Jeff spoke in detail about the inquiry process at PSII (shown in the image above). This process personalizes the curriculum for each student. In this process, each step of the learning is assessed, not just the end result. Their focus is on showing the work they are doing and less on the product. In traditional schools the product is usually the thing that is important for students to get a grade. Here, the teachers focus on emphasizing the importance of the journey and how they learned as they went along. Assessment “of, for, and as learning” as Jeff put it.
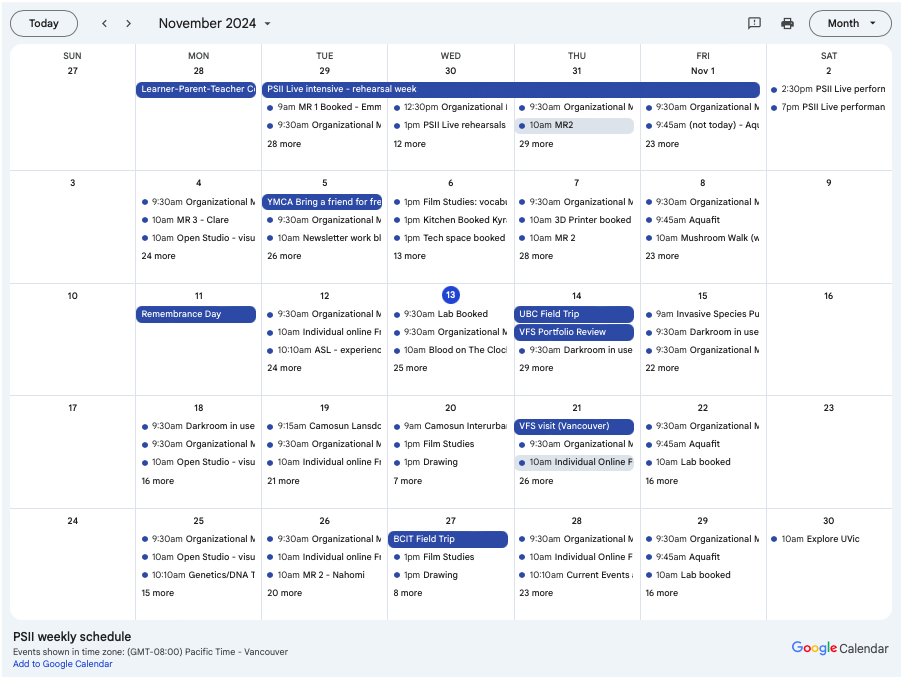
I found myself confused about how the day to day routine was structured at PSII. Luckily I had that question answered when Jeff spoke about how the teachers provide lessons during the day for groups of students that apply to the thing they are researching at the time. Each lesson and activity is posted in a google calendar that is accessible on their website. This colander posts events like ASL and Spanish meetings, Lab Times, important meetings for senior students, and many other things.
Click the image to be taken to the PSII site.
Response (So what?)
This school and our in-class presentation reminded me of the conflict I have been experiencing in this program and presented one of many solutions. My issue with current schooling is its structural inability to work with students to create interest and relevance. I know far too many people who live with the idea that they are “dumb” because the school system they went through made them feel that way. I think that any system that makes children feel this way, yet is still required for students to attend, is fundamentally broken. I avoided being a teacher for a while after my undergrad for this reason, I do not want to contribute to a system that is doing this. Jeff reminded me that there are ways around this and other options for success.
I listened to a podcast recently while doing research for another project. It is from the EduCrush podcast hosted by Natalie Verdabasso doing an interview featuring Starr Sackstein. This podcast speaks to the practise of releasing more control of the assessment process to the students that are being assessed. Starr believes that when teachers feel the need to control the entire teaching and assessing process, it is because they feel that their students are incapable of taking responsibility for their own learning. At the end of the day, thinking like this can not be helpful for students because it is not teaching them to take control of their own learning and being life-long learning. Starr believes that trusting your students can go a long way.
I think this idea of inquiry and less control of assessment is incredibly relevant for students who feel unseen in the school system and emerge with a lack of education (because the curriculum did not relate to them) and a lack of self-esteem and confidence. At the end of the day, not only was this system unhelpful for them, it was detrimental.
What now?
Photo by Efrem Efre : https://www.pexels.com/photo/neon-lights-27604141/
I have not had the chance to yet, but I plan to visit PSII. I feel so much hope in the work they are doing and I believe that they are headed in the direction of true and successful change to the way people have been doing education since the time of the one room school building.
Since this meeting I have found myself researching similar independent schools and the more I learn, the more I see myself as a future employee of one of these schools! For the rest of this program I can envision myself looking for places to insert what this has begun to teach me. Projects, presentations, and practicum are opportunities for me to practice and continue to learn this style of teaching.
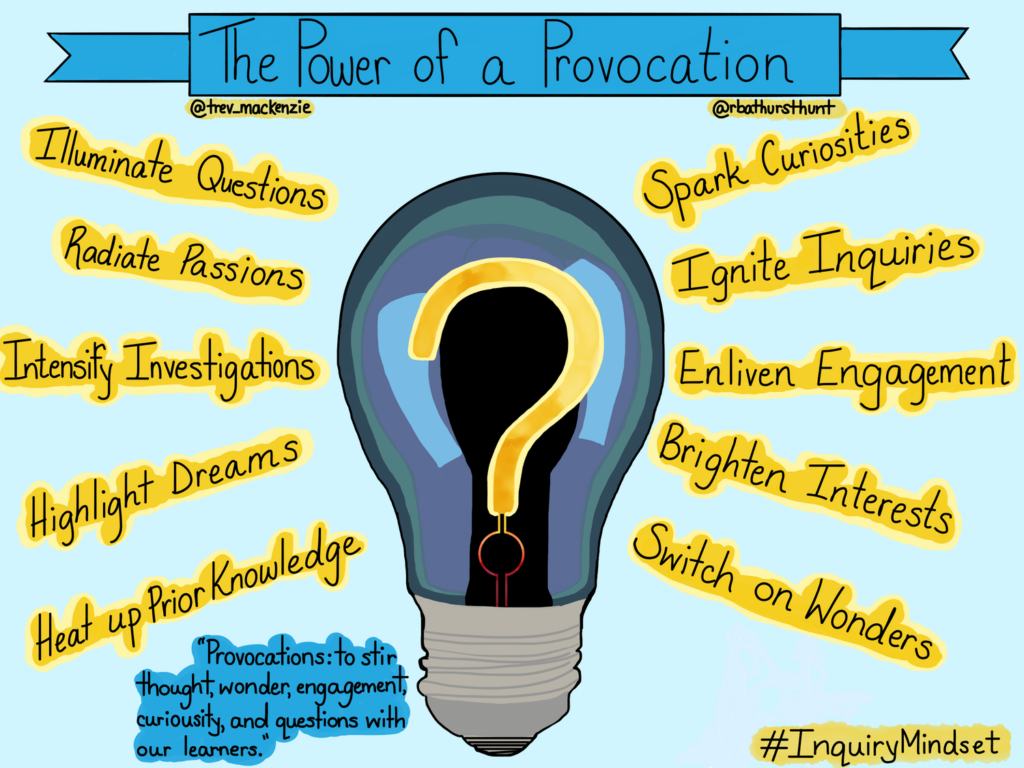
This week we had guest speaker Trever Mackenzie speak and I thought he did a fantastic job at giving out cohort insights into how to take the theory we are learning and start thinking about putting it into practice. Additionally, he gave me lots of food for thought about how I am going to assess and assign grades to my students. His example of how he holds conferences with his student at the end of the semester is something I will be adding into my toolkit as this is exactly the type of way I want to be working with my students on their learning and assessing their learning with them: the learners. This talk reminded me of the importance of having the learner be part of the conversation in the final product and mark as they are the ones who have done all the work.
Trevor gave me words for what I have been internally grappling with: Why are we assessing a classroom full of diverse students with one limiting project/assignment? And why are we grading assignments we want the students to learn from? Trevor talked about taking feedback “from redundant to powerful” and using the feedback to drive the inquiry of the students. He went on to say that the feedback not only needed to be separated from the grade but that it needed to be, “kind, specific, and helpful”. This is an important reminder because of all the teachers I have had in my life, the ones I remember most are the ones who modelled their teaching practices after those three words. This is important not only for teachers, but for students as well. They should be giving each other feedback and learning to be kind, specific, and helpful while they do so. This helps them to learn and it helps their peers as well.
Trevor was able to show me there are other option out there for how we assess students and that every step of the process up to and including the assessment should be done with the student and not separate from them. This can seem very daunting from the eyes of someone who has not even stepped into a teaching role yet, but the image I grabbed from Trevor’s website is a good way to remind myself that there are ways this can be done throughout the class time and from very early on. Provoking your students to be curious and to use that curiosity to investigate and learn. In the lecture we saw students who were encouraged to pursue their interests in an inquiry project and how far the students went in the amount of effort they were willing to put into the project when they were interested and had to right amount of support.
Taken from https://www.trevormackenzie.com/posts/2024/9/26/inquiry-is-curiosity from his most recent blog post titled “Inquiry is Curiousity”
Something I heard in the lecture that was difficult for me to understand was the idea that you can co create the expectations for students with the students. This seems difficult to me because as teachers we do have certain curriculum we must teach and this seems too open ended to meet the end of course deadlines. I wonder how this can be done with students while keeping them to the curriculum goals?
Overall I thought Trevor was a fantastic guest to have on and his talk has left me with plenty to think about as I delve further into the theory of teaching. I hope he has the chance to attend for future cohorts as the ideas he brings to the course are highly valuable.
I did some digging around on Trevor’s website and realized he also has a section for podcasts. I decided to listen to a couple of them to continue to feed this thought process it has started me on. His podcasts can be found here.