I have seen many Zoom recordings in my day but have yet to make one myself.I figured today was the day to change that.
I find these really helpful because I can go back and revisit a conversation I had, see a tutorial from a professor, or even just watch a lecture again. Now that we are back to mostly in-person learning, I still think this is a really useful way to record a presentation and share it.
Summary (What)
Leanupon.com website provides a super helpful set-by-step guide for creating your own zoom meeting recording. They take you through options for saving the file is different places, things you can record, and ways you might find this tool useful.
When you record your meeting on Zoom you have the option to either save to your computer or to save to the cloud. Saving to your computer will put the file directly on your hard drive and you can access and edit it there. If you save to the cloud it stores in your “my recordings” on your zoom account and you can more easily share it with other collaborators. For my project I saved both files to my computer because it made it easier to crop and share on my blog post.
Learnupon recommends using Zoom to record presentation, training sessions, and product sessions (potentially not the most applicable option for upcoming teachers, but you never know). The benefits of recording zoom meetings is to share with a wider audience who were unable to attend and to edit post meeting for a more professional finish. I would add to this, as a future teacher, that saving the meeting and recording presentations allows students to view the video when they need it later on.
- To record on Zoom, you need to start the meeting as host.
- During the meeting click on the button to record (or click on “more options” and hit record within the menu it provides).
- Choose where you want to save the video (cloud or on your computer).
- A recording message is played to you and displayed on the screen for all participants.
- Once you are recording, you can screen share (especially useful if you are recording a presentation) and choose which screen you want to share. You can share the presenter, record a presentation as the speaker speaks over it, or record a presentation with a thumbnail image of the speaker in the corner. For my examples I did one where you can see me in the corner, and one where my voice is heard but I am not seen.
- When you are done recording hit the record button again (or click on more and hit the record option) and a sound will play indicating to you and all participants that the recording has stopped.
- Once the meeting has ended, if you chose to save the file to your computer, the file will convert to MP4 and save to your hard drive.
So What?
Now I know how to do this, why should I? I already found a use for a recording I have done. I recorded a whiteboard presentation on Zoom describing the conversation we had during our EdCamp activity in our class. This was a great way for me to learn how to do this and create something useful for this class at the same time. This was a way for me to share a verbal conversation verbally (which felt more authentic to me instead of typing it out).
Please excuse any lisp you might here, I was still recovering from a dental surgery during the filming of this and have some swelling which impacts my speech a bit.
I am likely to use this method for an upcoming project where I am going to create a flowchart. I will use screen share to explain how it works vocally instead of writing paragraphs to describe the flow of the chart. Understanding how this works and realizing how simple it is has made me want to use it more because it is such a powerful tool.
Recording presentations is a great example of creating opportunities for students to listen when they are most likely to learn. School environments are often not designed to calm students enough for them to absorb. When you post things like presentations and slides with a voice over after-the-fact there is space for students to watch when they are at home and self-regulated. This can make the class time less frustrating for students because they know they will have the chance to access this material at a later time if they cannot absorb it in class.
Now What?
Before we dive into my journey with Zoom recordings please view this screenshot.
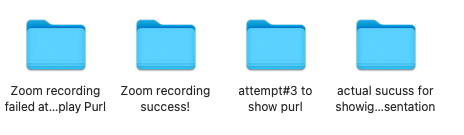
The entire process was a struggle. I spent a lot of time on it, and I did not really end up solving my problem but I got really close.
I had…trouble with this.
I have already demonstrated the whiteboard example I recorded. This was quite simple for me. I was able to jot down my ideas from my memory of the conversation with the built in arrows that work with the sticky notes.
My next goal was to record a presentation with a software other than Zoom. I chose to use a presentation I made for class last week which had a video embedded in it (because I see teachers struggle with this all the time and I want to be prepared). This was not straightforward and honestly, humbling. At first, I share the presentation on presenter view thinking that the recording would record the slides only and not see the presenter view. That was wrong. I recorded the whole thing in presenter view. I also realized the video would not work in the presentation.
At minute 3:20 you can see that I “paused the video” to see what the issue was. Here, I meant to pause the recording but only paused the screen share. I now know you have to hit pause recording which is next to the stop recoding button. Please enjoy that minute or so of awkward silence.
I re-embedded the video and did the meeting a second time. Success! The video was visible to the meeting. When I saved the file I changed the name before it converted and lost the file…oops.
At this point, I tried again with a new recording to play the video. I failed again to play the video and tired to share it on YouTube but did not realize I had not shared that screen with the Zoom presentation, so again…no video.
A fourth attempt, I recorded the meeting and tried to share the video. And, well, watch for yourself:
I muted myself so I would not interfere with the sound that was played but I realize you cannot hear the video at all.
Attempt number 5. We are now on the next day and I am determined to make this work. I started another meeting and went to share my screen and BEHOLD! You must share you computer audio when you share your screen to make it work! By trial and error I think I have done it!
No, this is not a full presentation, but I feel I have learned a lot through this process and have the skills to make a full presentation at this point.
Final Thoughts
Do not forget to share your computer audio when sharing video during a presentation! Also, make these videos during the middle of the day, not the middle of the night. Trust me.
I think that the product is worth the learning curve. But there is a big learning curve! For the reasons I discussed before, I think educational videos are really important to have as part of your teaching practice, but I think the key word there is practice, you need to practice making them.